Build guide
Bell Siphon: How It Works and How to Build One
As an Amazon Associate we earn from qualifying purchases. How we choose products.
On this page
A bell siphon is a small, pump-free drain that empties an aquaponics grow bed all by itself, again and again, so the plant roots get water and then air. It has no moving parts and no timer: three pieces of plastic pipe do the work. It is also the part to check first when a media bed misbehaves, because most flood-and-drain problems start there.
This guide explains how a bell siphon works, gives the exact dimensions from two published plans (the FAO aquaponics manual and the University of Hawaii extension sheet), walks through a DIY build step by step, and covers the fixes for a siphon that will not start or will not stop. If you would rather not cut pipe, the kits at the end are our picks.
What Is a Bell Siphon?
A bell siphon is a type of autosiphon: a siphon that starts and stops on its own, depending on the water level around it. The University of Hawaii extension sheet Construction of Automatic Bell Siphons for Backyard Aquaponic Systems (Fox, Howerton and Tamaru, CTAHR BIO-10, 2010) calls it one of the simplest and most reliable autosiphons, and notes that how to make and run one is among the questions its aquaculture extension workers hear most often.
In aquaponics it sits in a media-filled grow bed. Water from the fish tank flows into the bed at a steady rate, the bed fills, and when the water reaches a set height the siphon kicks in and drains the bed quickly back to the fish tank or sump. Then it stops, and the bed fills again. Clemson Cooperative Extension describes the same flood and drain setup in Aquaponics: System Layout and Components (Beecher, 2021), and adds why it matters: because the root zone is aerated every time the bed drains, the oxygen level of the incoming water is less critical than in a raft system.
The Parts of a Bell Siphon
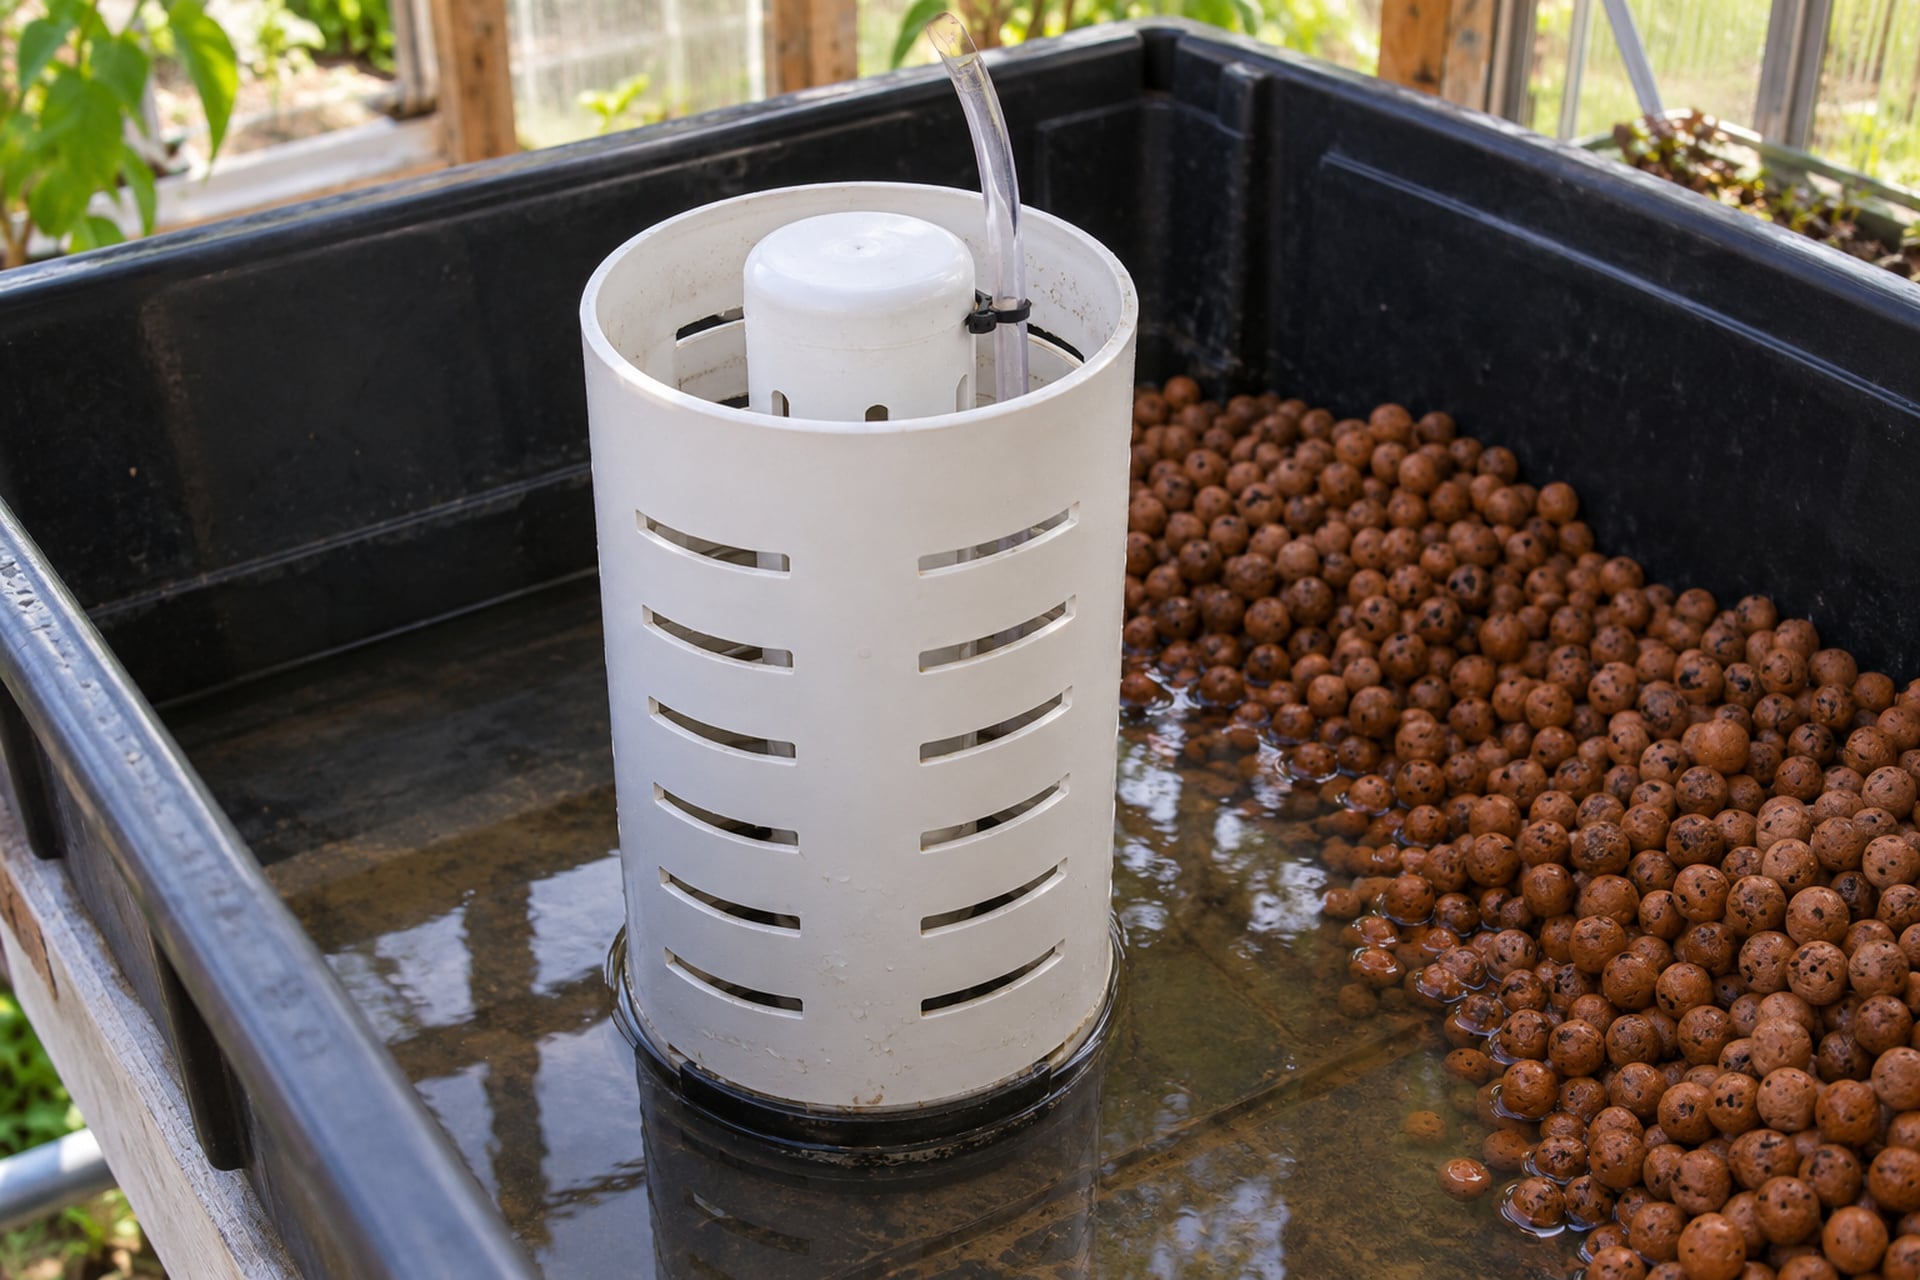
- Standpipe. A vertical pipe that comes up through a fitting in the floor of the grow bed. Its top edge is the highest level the water can reach. Below the bed it becomes the drain.
- Bell. A wider pipe, capped at the top, that sits over the standpipe like a hat. Notches or slots cut into its bottom edge let water in and, at the end of the drain, let air in.
- Media guard. A still wider pipe with many slots or holes, placed around the bell so that gravel or clay pebbles cannot reach it. Hawaii's authors say the siphon works without one, but that it is well worth the extra effort because you can lift the bell out for cleaning without digging through the media.
- Snorkel (optional). A thin tube that runs from the top of the bell down its side and ends just above the slots. When the water drops to its open end, it lets air into the bell and breaks the siphon cleanly. FAO's design gets the same effect from a small hole drilled near the bottom of the bell.
Where the Idea Comes From
Nobody is credited with inventing the bell siphon for aquaponics. The principle is old: Grady Hillhouse points out in Automatic Bell Siphon Explained (Practical Engineering, 2017) that the Pythagoras cup, one of the oldest practical joke devices, uses the same mechanism, and that dosing siphons in septic systems and the flush tanks of public urinals work the same way. Hawaii's extension sheet says bell siphons have been used in ebb and flow hydroponic and aquaponic systems for several decades.
How a Bell Siphon Works
A siphon needs to be primed before it will run, which is why you usually have to suck on a hose to start one. The bell siphon primes itself. Hillhouse's explanation boils down to air pressure: as long as there is air inside the bell connected to the open air through the empty standpipe, nothing happens. Once the water seals that air in, falling water creates a partial vacuum and the bell starts pulling water out of the bed.
1. The Bed Fills
The pump sends water into the grow bed at a constant rate. It rises through the media and through the slots at the bottom of the bell, so the level inside the bell matches the level in the bed.
2. Water Spills Into the Standpipe
When the level reaches the top of the standpipe, water starts to trickle over its rim and down the drain. Without the bell, the bed would simply stay at that height, like an overflow. FAO's manual (Somerville et al., Small-scale aquaponic food production, FAO Technical Paper 589, 2014) describes exactly this, and why the bell changes it.
3. The Bell Seals and the Siphon Starts
The water now covers the bottom of the bell, so the air inside it is trapped. As water falls down the standpipe it drags that air with it, the pressure inside the bell drops, and the siphon starts. From this moment the bed empties far faster than the pump fills it. Hawaii's sheet adds a practical detail: two 90 degree elbows on the drain under the bed add just enough resistance to help the siphon start and stop.
4. Air Breaks the Siphon
When the water in the bed falls to the bottom of the bell, or to the open end of the snorkel, air rushes in, the vacuum collapses and the drain stops. The pump keeps running, so the bed starts to fill again and the cycle repeats as long as water flows in.
FAO's manual describes a media bed as three zones: a dry top 2 to 5 cm (about 1 to 2 inches) that blocks light, a wet and dry middle band of 10 to 20 cm (4 to 8 inches) where the water rises and falls, and a bottom 3 to 5 cm (1 to 2 inches) that stays wet. The bell siphon is what creates that middle band, which FAO says is where most of the biological activity happens. More on bed depth and media in our aquaponics grow bed guide.
Bell Siphon Dimensions: Two Published Designs
There is no single correct size. Both sources below say the dimensions depend on the size of the bed and on how fast water flows in. What they give is a starting point that has worked for them, and you will fine tune from there.
The FAO Design (Media Bed of 11 to 32 Square Feet)
FAO's manual gives these parts for a media bed of 1 to 3 square meters with 30 cm of media and an inflow of 200 to 500 liters per hour for each bed. The inch figures are our conversions.
| Part | FAO specification | In inches |
|---|---|---|
| Standpipe | PVC, 2.5 cm diameter, 22 cm tall | 1 in pipe, about 8.7 in tall |
| Bell | PVC, 7.5 cm diameter, 25 cm tall, end cap on top | 3 in pipe, about 9.8 in tall |
| Bell slots | Two gaps of 1 x 4 cm, 1.5 cm up, on opposite sides | About 0.4 x 1.6 in, 0.6 in from the bottom |
| Siphon breaker | One 1 cm hole, 5 cm from the bottom of the bell | About 0.4 in hole, 2 in up |
| Media guard | PVC, 11 cm diameter, 32 cm tall, many small holes | About 4.3 in pipe, 12.6 in tall |
| Inflow per bed | 200 to 500 L/h | About 53 to 132 gallons per hour |
The University of Hawaii Sizes (By Grow Bed Volume)
The Hawaii sheet gives four sizes that CTAHR researchers used successfully in square and rectangular tanks about 1 foot deep. The two smaller standpipes are vinyl tubing and the larger ones PVC pipe.
| Grow bed volume | Standpipe and drain | Bell pipe | Media guard (2x the bell) |
|---|---|---|---|
| 4 cu ft (about 30 gal) | 1/2 in | 1 in | 2 in or wider |
| 16 cu ft (about 120 gal) | 1 in | 2 in | 4 in or wider |
| 24 cu ft (about 180 gal) | 1 1/2 in | 3 in | 6 in or wider |
| 32 cu ft (about 240 gal) | 2 in | 4 in | 8 in or wider |
The Double-Double Rule
Hawaii's rule of thumb is easy to remember: the media guard should be at least double the diameter of the bell, and the bell double the diameter of the standpipe. Notice that FAO's design is wider than 2:1 at the bell (3 inch over 1 inch). Both work, which tells you the ratio is a guide rather than a law.
Heights That Have to Line Up
- The top of the standpipe sets the flood level. Hawaii recommends that this level sit 1 to 2 inches below the surface of the media, so the water is never exposed to light and algae and weeds do not grow.
- The top of the standpipe should be level with the bottom edge of the bell's cap. Hawaii's example: a 1/2 inch standpipe 5 1/2 inches tall with a 2 inch long cap means the whole bell, pipe plus cap, is 7 inches long, with its teeth resting on the fitting.
- The media goes 1 to 2 inches above the top of the bell.
- Hawaii puts the depth of the media at 8 to 12 inches for good filtration and plant growth; FAO's design uses 12 inches (30 cm).
How to Build a Bell Siphon
These steps follow the University of Hawaii sheet, with FAO's version noted where it differs. Alabama Extension also has a free video series by specialist David Cline that shows a bell siphon being built for an IBC system (Building an IBC Aquaponics System); the bell siphon episode is embedded below.
What You Need
- Schedule 40 PVC pipe in three sizes (for example 1 inch, 2 inch and 4 inch for a mid-size bed), plus one end cap that fits the bell pipe
- A bulkhead fitting for the standpipe, such as a Uniseal tank adapter, and a hole saw of the size its maker specifies
- Two 90 degree elbows and a short length of pipe for the drain under the bed
- Vinyl tubing for the snorkel, a drill, a hacksaw, PVC primer and cement, 100% silicone and a cable tie
- A ball valve on the inflow line, so you can tune the fill rate
Building the siphon, step by step
-
Fit the bulkhead and the standpipe
Drill a hole in the floor of the grow bed with the hole saw, push in the Uniseal, then push the standpipe through so part of it sticks out above and below the floor. Slide it up or down until its top sits where you want the highest water level: 1 to 2 inches below where the media surface will be.
-
Cap the bell
Prime and glue the end cap onto the bell pipe and give it a quarter turn to seal it. The joint has to be airtight; if air leaks in at the top, the siphon will not start.
-
Cut the bell to length and cut the teeth
Cut the bell so that, standing on the fitting, the underside of its cap is level with the top of the standpipe. Then cut notches into the open bottom end. Hawaii's method: two pairs of straight saw cuts at right angles across the end, a lateral cut at the top of each, then snap out the pieces with pliers. FAO cuts two rectangular gaps of about 1 x 4 cm instead.
-
Add the snorkel or the breaker hole
For a snorkel, drill a hole in the cap the size of your tubing, push the tube in so it reaches about 1/4 inch inside, seal it with silicone and let it cure. Run the tube down the bell, fix it with a cable tie and trim it so it ends just above the teeth. If it ends level with or below the teeth, the siphon will not break. FAO skips the snorkel and drills one 1 cm hole 5 cm from the bottom of the bell.
-
Make the media guard
Take a pipe about twice the diameter of the bell, slightly taller than the bell, and drill or cut slots along its whole length so water passes freely but media cannot.
-
Plumb the drain
Under the bed, add a 90 degree elbow to the bottom of the standpipe, a straight length of pipe long enough to reach over the fish tank or sump, and a second elbow pointing down. Hawaii's authors say these two elbows are necessary to help the siphon start and stop; a reducer on the bottom of the standpipe does a similar job.
-
Assemble, then add the media
Stand the bell over the standpipe with its teeth resting evenly on the fitting, set the guard around it, and pour rinsed media around the base of the guard first so it stays put. Fill the rest of the bed to 1 to 2 inches above the top of the bell.
-
Test before you add fish
Run water through and watch two or three full cycles. FAO recommends checking the plumbing for leaks first with the bell and standpipe removed, so the water flows straight down to the sump, then putting the siphon back.
Setting the Flow Rate and the Cycle Time
The speed of the cycle is set by how fast water comes in, not by the siphon. The faster the bed fills, the sooner it flushes. Hawaii's guideline is a full cycle every 15 to 20 minutes regardless of bed size, adjusted with a ball valve on the inflow. FAO says these systems usually go through the complete cycle once or twice an hour, though some successful systems cycle only three or four times a day.
The flow has to sit inside a window. Too little and the water never rises fast enough over the standpipe to seal the bell, so the bed just trickles at the top level. Too much and the siphon cannot outrun the inflow, so it never breaks and the bed drains for ever. FAO's design works with 200 to 500 liters per hour (about 53 to 132 gallons per hour) into each bed; for larger beds every component gets bigger.
If you run several beds from one pump, give each bed its own valve and tune them one at a time. Sizing the pump itself, including the head height it has to lift against, is covered in our aquaponics pump guide.
Bell Siphon Troubleshooting
FAO is honest about it: bell siphons can be finicky and need attention. These are the fixes from the University of Hawaii sheet, in the order its authors suggest trying them, plus two common causes from the dimensions above.
| Symptom | Likely cause | Fix |
|---|---|---|
| Bed fills to the top and stays there, trickling | Air leaking into the bell around the snorkel or the cap | Reseal the snorkel and the cap joint so they are airtight |
| Bed fills and stays full | Gravel or clay under the teeth lifts the bell and opens a gap | Lift the bell, clear the fitting, seat the bell and guard firmly |
| Bed fills and stays full | Inflow too slow to seal the bell | Open the inflow valve a little |
| Siphon never stops, bed stays drained | Snorkel blocked or pinched | Clear it, lift the bell to break the siphon by hand, put it back |
| Siphon never stops | Snorkel opening too low, too close to the teeth | Trim the snorkel slightly shorter, a little at a time |
| Siphon starts or stops unreliably | Drain geometry | Try longer or shorter pipe between the two elbows under the bed |
| Siphon never stops | Inflow faster than the siphon can drain | Close the inflow valve a little; Hawaii says this is rarely the cause |
Bell Siphon vs Timer and Standpipe
A bell siphon is not the only way to flood and drain a bed. FAO describes a second method that uses a timer on the pump and a plain standpipe with a small hole near its base, and it also mentions the looped siphon as another option under research. A constant flow bed, where the water level never changes, is also valid: FAO notes that some experts have shown constant flow designs support the same plant growth rates.
| Bell siphon | Timer and standpipe | Constant flow | |
|---|---|---|---|
| Moving parts | None | A timer switch | None |
| Pump runs | All the time | On and off | All the time |
| Tuning | Flow rate and drain geometry | Timer settings and drip hole size | Almost none |
| Fish tank aeration | Steady water movement | FAO notes less circulation and aeration, so extra air is needed | Steady water movement |
| Best for | Most home media beds | Builders who prefer electronics over plumbing | Small beds, beginners |
FAO's timer version uses a 2.5 cm standpipe 23 cm tall with a 6 to 12 mm drip hole 2.5 cm above its base, inside an 11 cm guard. It also says the whole fish tank volume should pass through the grow beds every hour, and that beds should be flushed weekly by pulling the standpipe. If you go this way, a plain outdoor 24 hour mechanical timer switches the pump in 30 minute steps.
The Best Bell Siphon Kits
A kit saves you the pipe sizing and the cutting, and the parts come matched. We chose from the bell siphon kits sold on Amazon with the most buyer reviews and a solid average rating, and confirmed that each one is currently sold on Amazon US. All three come from the same maker in three sizes, so pick by the depth of your media.

Smoky Mountain Aquaponics Bell Siphon Kit for 12 Inch Media (Best for IBC Beds)
Made for a grow bed cut from an IBC tote with 12 inches of media, which is the depth FAO and most IBC builds use. The listing says you get a 4 inch slotted gravel shield 14 inches tall, a 3 inch bell 12 inches high with a cap and a pull handle, a male and female threaded adapter pair with an O-ring to pass through the bed floor, two 1 inch elbows for the drain, and 1 inch pipe in three lengths that you swap to change the water level.
The maker also includes a 1 inch to 2 inch adapter and two extenders for the water level. The pull handle is a small thing that matters: you will lift the bell out to clean it, and you will do it with wet hands. Pair it with an IBC aquaponics build.

Smoky Mountain Aquaponics Bell Siphon Kit for 8 Inch Media
The middle size, for stock tank or wooden beds with up to 8 inches of media. According to the listing it has a 3 inch slotted gravel shield 10 inches high, a 2 inch bell 8 inches high with a cap and pull handle, the threaded bulkhead adapters, two 3/4 inch elbows, 3/4 inch pipe in three lengths, and a 3/4 inch to 1 1/4 inch adapter. A 2 inch bell over 3/4 inch pipe is close to the 2:1 ratio in the Hawaii sheet.

Smoky Mountain Aquaponics Bell Siphon Kit for 6 Inch Media (Best for Small Beds)
For shallow beds, tabletop systems and half-size Dutch buckets. The listing lists a 2 inch gravel shield 7 inches high, a 1 1/4 inch bell 6.5 inches high with a cap and pull handle, the threaded adapter pair, two 1/2 inch elbows and 1/2 inch pipe in four lengths. Six inches of media is at the bottom of the 6 to 12 inch range Oklahoma State gives for media beds, so this one suits herbs and lettuce rather than tomatoes.
Bell Siphon FAQ
It drains a grow bed automatically whenever the water reaches a set height, then stops and lets the bed refill. That turns a constant trickle from the pump into a flood and drain cycle, so plant roots and bacteria in the media get fresh water and then fresh air, with no timer and no moving parts.
Fit a standpipe through the bed floor with a bulkhead, cap a pipe about twice its width as the bell, cut slots in the bell's bottom edge, add a snorkel or small breaker hole, and surround it with a slotted guard. Plumb two elbows under the bed, then tune the inflow until it cycles reliably.
No single inventor is credited. The self-starting siphon is ancient: the Pythagoras cup from classical Greece works on the same principle, and similar dosing siphons are used in septic systems and urinal flush tanks. Gardeners adapted it to flood and drain hydroponic and aquaponic beds several decades ago, according to University of Hawaii extension authors.
Its job is to aerate the root zone. Each time the bed drains, air is pulled down into the media, which feeds oxygen to the roots and to the nitrifying bacteria that turn fish waste into plant food. It also keeps the media from going stagnant and clogging, while the pump runs steadily without a timer.
Yes, but only to fill the bed. The siphon handles the draining by gravity. Any pump that delivers a steady flow works, usually a submersible pump in the sump or fish tank, and a ball valve lets you trim that flow until the bed completes a full cycle every 15 to 20 minutes.
If you have one or two beds and no spare PVC, usually yes. A kit arrives with the bell, guard, adapters and elbows already matched, which removes most of the guesswork. If you are building several beds, or already own the pipe and a hole saw, making your own is cheaper and just as reliable.
Next steps: choose the bed and media in our grow bed guide, fill it with clay pebbles, size the pump, and see the whole system come together in how to build an aquaponics system.
Grow along with us
New guides and seasonal tips for fish, plants and DIY builds, about once a month.